Hello again, I know its been a while... well more than a while since I made my last post. For some reason school, work, and life got in the way and I got very behind. But I'm back now! I will try to post a few things a month for the next few months, and then after that I am going to try and post even more, since then I will officially be done my Undergraduate Degree and in theory should have more time to devote to showing you how to do cool things with your sewing machine and other crafty things that I try out! Doesn't that sound fun?
Well now to what you probably actually care about - How to make bindingless placemats! This tutorial gives you the amounts of needed items for 2 placemats, but if you need to do more just double or triple or possibly even quadruple the amounts of the initial fabric squares and make as many as you want.

What you need:
A sewing machine (unless you are a very determined person and you really love hand sewing)
1/2 a meter of a fabric (This will be the larger squares on the mats - mine are blue)
1/4 a meter of a different fabric (This will be one of the smaller squares - mine are light tan)
1/4 a meter another different fabric (This will be the other smaller squares - mine are dark tan)
1/2 a meter of backing fabric (Mine is green)
Thread (Quilting thread works best here)
Iron and Ironing Board
Rotary Cutter and Mat (or scissors)
Ruler
1. Start by cutting 6 squares 6 1/2'' by 6 1/2'' from the first fabric:


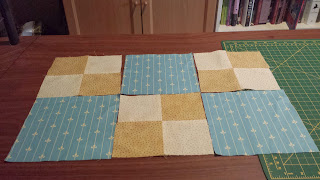
Then I sewed them together resulting in this:


Next do the bottom row in the same manner but this time sew a solid square, fronts together, with a chequered square. Then sew another solid square to the unsewn edge of the chequered square.
You will want to repeat the entirety of step 8 with your other blocks to create the rectangles for the front of the second placemat. It helps at this point to keep the strips separated into which mat they go with so that you don't accidentally sew two of the wrong strips together.
9. We want to connect these strips now into the front of our placemats. So place the two strips for the first placemat fronts together and sew along what you want to be the centre seam (careful of your patterns staying right side up). Remember to try to keep the points of each block lined up when you sew them together. You should end up with something like this:


Line all the edges up best you can and then PIN!

Then you want to sew all the around the edge EXCEPT for a 3 inch opening which I have made on the right hand and can be seem somewhat clearly on the second image below. On either side of this opening make sure you reinforce the start and end of the stitch by either doing a reverse stitch or if your sewing machine has this option a Fix stitch. I find that a reverse stitch secures best here but at other points you may want to use a fix stitch if possible.


Well now to what you probably actually care about - How to make bindingless placemats! This tutorial gives you the amounts of needed items for 2 placemats, but if you need to do more just double or triple or possibly even quadruple the amounts of the initial fabric squares and make as many as you want.

What you need:
A sewing machine (unless you are a very determined person and you really love hand sewing)
1/2 a meter of a fabric (This will be the larger squares on the mats - mine are blue)
1/4 a meter of a different fabric (This will be one of the smaller squares - mine are light tan)
1/4 a meter another different fabric (This will be the other smaller squares - mine are dark tan)
1/2 a meter of backing fabric (Mine is green)
Thread (Quilting thread works best here)
Iron and Ironing Board
Rotary Cutter and Mat (or scissors)
Ruler
1. Start by cutting 6 squares 6 1/2'' by 6 1/2'' from the first fabric:

2. Then cut 12 squares 3 1/2'' by 3 1/2'' from the second fabric and repeat this step with the third fabric:

3. Next cut 2 pieces 12 1/2'' by 18 1/2'' pieces form the fourth fabric which will make up the backing of the placemats:

This will give you something amounting to this:

4. Now take one of each colour of the smaller squares and sew them together using a 1/4'' seam (This is the seam I will be using the entire way through this tutorial and some machine may have it built in so check if yours does, sometimes its called a quilting stitch), fronts together along one side. I placed them into a square to get an idea of what they would look like first which you can see below just for the first one:

Then I placed them on top of each other fronts together like so:

Then I sewed them together resulting in this:

Then I did this many times sewing together each light tan square to a dark tan square giving me a pile that looks like this:

5. Now before we sew these rectangles together to make squares we need to iron their seams flat. This may sound unnecessary but its not, if you don't believe me see take a look at my other post that discusses why ironing is important.

6. Okay now that you have ironed All of your seams we can make the squares out of your rectangles. Place two rectangles ensuring that a light piece is over a dark piece on both sides with fronts together and sew them together. Be careful when going over your other seems so as they don't get pulled to either side.


Repeat step 6 with all the rest of the rectangles which will give you 6 chequered squares.
7. Take all of the chequered squares that you just made and iron down all of their seems which you can see in the last photo above
8. Now we want to take these squares and connect them with our single coloured squares into 4 rectangles which we will then connect. I find it helps to lay it out first so lay out your blocks like this first:

So now that you can easily see what you need to do. Start by taking one of your chequered squares and place it fronts together with a single coloured square then sew them together. Then on the unsewn edge of the solid coloured square sew another chequered square. (NOTE: if you have patterns on your fabric make sure they are all facing the same direction! I know this can be hard but don't let it frustrate you a stitch ripper can fix all). In the end you should have something that looks like this:

You will want to repeat the entirety of step 8 with your other blocks to create the rectangles for the front of the second placemat. It helps at this point to keep the strips separated into which mat they go with so that you don't accidentally sew two of the wrong strips together.
9. We want to connect these strips now into the front of our placemats. So place the two strips for the first placemat fronts together and sew along what you want to be the centre seam (careful of your patterns staying right side up). Remember to try to keep the points of each block lined up when you sew them together. You should end up with something like this:

Repeat step 9 for your second placemat front
10. Okay, now that we have our fronts we want to connect them to the backs which is where the bindingless part comes in. Take your piece of fabric meant for backing (sized 12 1/2'' by 18 1/2'') and place it fronts together with the placemat front you just made.

Line all the edges up best you can and then PIN!

Then you want to sew all the around the edge EXCEPT for a 3 inch opening which I have made on the right hand and can be seem somewhat clearly on the second image below. On either side of this opening make sure you reinforce the start and end of the stitch by either doing a reverse stitch or if your sewing machine has this option a Fix stitch. I find that a reverse stitch secures best here but at other points you may want to use a fix stitch if possible.


Now using the hole you made pull the inside fabric outwards this will turn the placemat right side out.

Giving you this:

11. Pin shut the opening by tucking the raw edge in and pinning (sorry I didn't take a photo here).
12. At this point we are going to "quilt", well not really but we are going to do something close to it! Its not technically quilting since there is no third piece of fabric in the middle but that's okay its great practice. If you have a walking foot now if the time you want to grab, if not that's okay just use your normal foot. A walking foot generally looks something like this:

Follow your foots instructions for attachment to your machine. All the walking foot does is give you better control and because it has feed dogs (those teethy bits that pull your fabric through the machine) of its own it helps to keep multiple pieces of fabric together.
So now that you've got foot all ready or you are just using your regular foot you are ready to start sewing. Essentially you want to outline all of the seams on your placemat. BUT you have to do this from the middle outwards to prevent any bunching. Where you want to sew is just barely to the left or right of the seam lines on your machine as is shown below:
 |
| This is with the walking foot! |
 |
| This is with a regular foot (I did one placemat with one type of foot and one with the other) |
How you are going to sew I've shown on the image below. You don't have to follow this exactly but remember start in the centre and move outwards (The circle in the middle is the centre point that you should move outwards from for line 1 and 2):

13. This is the fun part! Choose the prettiest stitch on your sewing machine (if your machine doesn't have any decorative stitches or you just hate them for some reason that's okay too! just use a straight stitch). Start at a corner on the side with the opening and sew all the way around the placemat.
I find that one continual stitch gives the nicest look all the way around - to do this you want to leave the need in the fabric mid-stitch, when you get to the point to turn to the next edge (a 1/4'' left on the edge you're sewing), lift the foot and turn the fabric then place the foot back down and continue sewing.
So finally you will have a placemat that looks like this:

Repeat steps 10 - 13 for your second placemat and now you should have a set of two!

Good job! And thank you so much for using my tutorial! If you have any questions please ask in the comments. I hope that you had as much fun doing this as I did and good luck in your future new experiences!